Tuesday, November 6, 2012

How to import Catalogs into a Backup Exec 12.x or later for Windows Servers installation


http://www.symantec.com/business/support/index?page=content&id=TECH68896 - link

Problem


How to import Catalogs into a Backup Exec 12.x or later for Windows Servers installation

Solution


To import catalog files to a new or upgraded installation of Backup Exec (tm) 12.x or later from a server running the same or a prior version of Backup Exec, perform the following steps:

1. Locate the catalogs folder where the catalogs will be imported from.

2. Copy all the files from catalogs folder and subfolder (if one exists) with extensions .xml, and .fh, as shown (Figure 1)


3. Paste the copied files to the root of current (target) catalogs folder.

Note: By default the catalogs are stored at the following location:

  C:\Program Files\Symantec\Backup Exec\Catalogs.

4. Once all the files are moved into the new catalogs folder, restart Backup Exec services to re-index the imported catalogs.  Depending on the amount of catalogs imported, it may take some time for this to complete.  Check the Restore Selection view to confirm the catalogs have imported correctly.  If the catalogs indexed properly, the files will be moved to a server named subfolder under the catalogs folder and a file named UpgradeIndexInfo.upg will also be present (Figure 2)


Note:  Even though the Restore Selections reflecting the catalogs migrated from another media server may now show, a restore operation can only be performed after an inventory of the respective media has been performed. When catalogs are copied to a media server that has not used or inventoried the media in question, the media information is not present in the Backup Exec Advanced Device And Media Management (ADAMM) database, and the restore job will fail do to it referencing a media ID that is unknown.

Note:  If the Restore Selections do not show properly after performing the steps above, perform the steps in the following Technote to re-index the catalogs from a command prompt:


Errors occur after upgrading Backup Exec and selections are missing in the Restore Selections window
  http://www.symantec.com/docs/TECH67271


Wednesday, October 31, 2012

Import one PST into all the mailboxes located in Exchange2010 in one-short


Issue : Import one PST into all the mailboxes in the Exchange Organization what I did was;


Resolution:
I have exported all the mailboxes alias names to .CSV file & run below command to Import the PST into the
mailbox aliases

Import-CSV \\mbx\PST\New.csv | Foreach{ New-MailboxImportRequest -Mailbox $_.Alias -FilePath \\mbx\PST\v2cal.pst}

After I ran above command, it was giving below error;
Cause : I was not added the user account which I was logged on Exchange cas server into the share where I had kept PST file, we need to give Full access to the share for that account.

Import-CSV \\mbx\PST\New.csv | Foreach{ New-MailboxImportRequest -Mailbox $_.Alias -FilePath \\mbx\PST\v2cal.pst}
Import-Csv : Cannot open file "\\mbx\PST\New.csv".
At line:1 char:11
+ Import-CSV <<<<  \\mbx\PST\New.csv | Foreach{ New-MailboxImportRequest -Mailbox $_.Alias -FilePath \\mbx\PST\v2cal.ps
t}
    + CategoryInfo          : OpenError: (:) [Import-Csv], UnauthorizedAccessException
    + FullyQualifiedErrorId : FileOpenFailure,Microsoft.PowerShell.Commands.ImportCsvCommand

After changed the above settings, it's working fine.


In one-short am able to import one PST into all the mailboxes in my ORG.
User account which I am using its not added into the share where I had kept the PST file.


http://social.technet.microsoft.com/Forums/en-US/exchange2010/thread/c3ad4e47-1156-4ea6-b846-ec67815e0572 - link


Thursday, October 25, 2012

Copying Files Over Remote Desktop

Hi All,

We can copy the files from local machine to Remote Desktop machine by using the below link;

Thanks to the people those who explore new tips ;

http://haacked.com/archive/2010/05/17/remote-desktop-file-copy.aspx

Thursday, September 27, 2012

SYSVol content is not replicating from one DC to another DC

SYSVol Content is not replicating from one DC to another DC:

Event Error log is:


Resolution is:To perform a nonauthoritative restore, stop the FRS service, configure the BurFlags registry key, and then restart the FRS service. To do so:
1. Click Start, and then click Run.
2. In the Open box, type cmd and then press ENTER.
3. In the Command box, type net stop ntfrs.
4. Click Start, and then click Run.
5. In the Open box, type regedit and then press ENTER.
6. Locate the following subkey in the registry:
HKEY_LOCAL_MACHINE\System\CurrentControlSet\Servic es\NtFrs\Parameters\Backup/Restore\Process at Startup
7. In the right pane, double-click BurFlags.
8. In the Edit DWORD Value dialog box, type D2 and then click OK.
9. Quit Registry Editor, and then switch to the Command box.
10. In the Command box, type net start ntfrs.
11. Quit the Command box.

When the FRS service restarts, the following actions occur:
• The value for BurFlags registry key returns to 0.
• Files in the reinitialized FRS folders are moved to a Pre-existing folder.
• The FRS database is rebuilt.
• The member performs an initial join of the replica set from an upstream partner or from the computer that is specified in the Replica Set Parent registry key if a parent has been specified for SYSVOL replica sets.
• The reinitialized computer performs a full replication of the affected replica sets when the relevant replication schedule begins.

Wednesday, September 12, 2012

Exchange 2010 SP2 Installation Issues


Exchange 2010 SP2 Installation Issues


Install Exchange 2010 SP2 issues:

When I tried install SP2 on Casnhub server, it has been given below errors;


I have installed all the WindowsUpdates with latest updates;

Updated Active Directory Schema on canhub by running below command;

Your AD replication should work properly & domain controllers should be online

Setup.com /PrepareSchema
Completed successfully,

now I ran this command on casnhub, switch to SP2 folder in CMD & ran below command

Setup /mode:upgrade /installwindowscomponents

it's installed successfully EX2010 SP2 without any errors.

Build ProductVersion will display 14.02.0247.005


Now I am installing SP2 on MBX, I just started in GUI setup.exe from SP2 folder,

Friday, August 24, 2012

Not able to delete mails from Web App after installing

Not able to delete mails from Web App after installing WinDeveloper OWA Message Recall on Casnhub server


Do the same settings on your casnhub server & go to IIS & click on +icon on Default Web site & click on Bind Settings on right hand side; Type server IP OR loopback IP OR viceversa like If you find local IP then type Loop back IP for both but it should not contain Host name of the server's.


The same issue arises & there are N no. of resolutions are there, Some of the links are:
http://social.technet.microsoft.com/Forums/en-US/exchange2010/thread/26f46cfb-4335-4dd4-999d-301e70f89607

http://www.doitfixit.com/index.php?option=com_content&view=article&id=75:unable-to-delete-mails&catid=34:exchange-2010&Itemid=53

http://www.experts-exchange.com/Software/Server_Software/Email_Servers/Exchange/Q_26613444.html

http://www.exchangeinbox.com/article.aspx?i=189

http://social.technet.microsoft.com/Forums/en-US/exchangesvrgeneral/thread/ce34c9a3-311e-402d-86d4-89fb3773a9b2


Wednesday, August 22, 2012

After Applying the Software restriction policy how to enable unrestrict the software installation

After Applying the Software restriction policy how to enable unrestrict the software installation

http://www.bhcblog.com/2009/03/09/fix-for-the-system-administrator-has-set-policies-to-prevent-this-installation-error/ - link

http://answers.microsoft.com/en-us/windows/forum/windows_7-security/error-the-system-administrator-has-set-policies-to/b5350e90-fe4b-4544-8549-20c6a7befb51 - link

This worked for me:
  1. Browse the registry to HKLM\Software\Policies\Microsoft\Windows\Installer
    Create: DisableMSI       Type: REG_DWORD  value = 0   (0 should allow you to install it was originally 1)
Sertings in Scrren shots;


After this try to install any .exe set up & it should work fine.

Try below if above doesn't work;

 Is the computer on a domain?
·        Is the issue isolated to only this software or you get the same error message with other software’s as well?
Try the steps below and check if it helps.
Step 1:
Run the software setup file as an administrator and check if it helps.
a. Right click on the setup file of the software that you are trying to install.
b. Select “Run as administrator”.
Step 2:
Temporarily disable the antivirus software running on the computer and check if you are able to install the software.
Warning:
Antivirus software can help protect your computer against viruses and other security threats. In most cases, you shouldn't disable your antivirus software. If you have to temporarily disable it to install other software, you should re-enable it as soon as you're done. If you're connected to the Internet or a network while your antivirus software is disabled, your computer is vulnerable to attacks.
Step 3:
a. Click Start, type "Local Security Policy" (without quotes) and press enter.
b. Click on Software Restriction Policies.
c. In the right pane, double click on the "enforcement".
d. Select “All users except local administrators”.
e. Click Ok and restart the computer and check if the issue is fixed.
Thanks and Regards,
Santosh Y – Microsoft Support

Visit our Microsoft Answers Feedback Forum and let us know what you think.
[If this post was helpful, please click the "Vote As Helpful" (green triangle) button. If it helps in resolving your issue, click "Propose As Answer" or "Mark As Answer" button. By proposing/marking a post as Answered, or Helpful you help others find the answer faster.

Try this;
This worked for me:
  1. Browse the registry to HKLM\Software\Policies\Microsoft\Windows\Installer
    Create: DisableMSI       Type: REG_DWORD  value = 0   (0 should allow you to install it was originally 1)
  2. Browse to HKEY_CLASSES_ROOT\Installer\Products\
    Search the list for the product that is causing the error.. delete the folder in the products folder…  this may also correct your error.
Good luck!

Try this method:
  1. Log on under an Admin account.
  2. Create a System Restore point (this is compulsory!)
  3. Run regedit.exe.
  4. Delete the following keys:
    [HKEY_LOCAL_MACHINE\Software\Policies\Microsoft]
    [HKEY_LOCAL_MACHINE\Software\Microsoft\Windows\CurrentVersion\Policies
    [HKEY_LOCAL_MACHINE\Software\Microsoft\Windows\CurrentVersion\Group Policy]
    [HKEY_CURRENT_USER\Software\Policies\Microsoft]
    [HKEY_CURRENT_USER\Software\Microsoft\Windows\CurrentVersion\Group Policy]
    [HKEY_CURRENT_USER\Software\Microsoft\Windows\CurrentVersion\Policies

try this method;
I've tried all the above options and then had no result. Finally, I turn off User Account Control and done ^ ^, I can install my software now. Hope it will work wiz you too. Pls try: Control Panel => User Accounts => User Accounts => Turn User Account Control on or off.

Tuesday, August 7, 2012

How to Delete a particular email from all the mailboxes OR from one mailbox

How to Delete a particular email from all the mailboxes OR from one mailbox


Pre-requisites to per for this task, we need to have the permissions:

Add the User to Discovery Management To Enable Search-Mailbox
Add the User to Mailbox Import Export To Enable -DeleteContent Switch

New-Managementroleassigment -Role "mailbox import Export" -User "administrator"
Now For Example to Delete a Specific Subject. Use log only Switch to verfiy how many counts you are  deleting (Valid one or not )


To delete a specific mail from all the mailboxes & to find out in how many mailboxes the specific mail
is located, for searching in all the mailboxes use below command

[PS] C:\Windows\system32>Get-mailbox | search-Mailbox -SearchQuery "Subject:'\m/, kick ass bye to all'" -Logonly -Target
Folder Inbox -Targetmailbox anand.sunka

It will generate the log like showing in the no. of mailboxes its located.

To delete that email use below command;
Get-mailbox | search-Mailbox -SearchQuery "Subject:'Delete Me'" -DeleteContent


http://social.technet.microsoft.com/Forums/en-US/exchangesvradmin/thread/57d23507-a627-492a-a6b4-f04a374cc48a - Link

http://social.technet.microsoft.com/Forums/en-US/exchange2010/thread/4e1084ac-1f19-4a57-938a-0ce1cde9e8d2


http://social.technet.microsoft.com/Forums/en-US/exchange2010/thread/09ebaa31-9004-45ab-b05c-4986e081bef3/


http://technet.microsoft.com/en-us/library/dd298173.aspx

http://technet.microsoft.com/en-us/library/dd298173.aspx


User had send 1 confidential mail to mail group by mistaken, now he wants to recall but recall
doesn't work out, hence wants to delete the mail from each mailbox of user's, then you need
to run below command to delete particular mail from all the mailboxes

Need to run this command on casnhub server not on mailbox server
[PS] C:\Windows\system32>Search-Mailbox -Identity "Shreejith Mohanan" -SearchQuery 'Subject:"Certificate format Sungevit
y / Process level Metrics / Team alignment "' -DeleteContent


[PS] C:\Windows\system32>Search-Mailbox -Identity "Anjan Chatterjee" -SearchQuery 'Subject:"Revenue Folder "' -DeleteContent


Monday, August 6, 2012

Apply Recipient Limits on a Database level in Exchange2010


Steps to apply a Recipient Policy @ database level in Exchange2010:

Below command is used to export all the details of Mailboxes in a Specific DB to .csv file. It will shows the details of Alias, recipient limits, prohit etc. as it shows down.

How to run the command in EMS: Copy this command in a notepad & make it to a oneline & run this command, then only it works like charm.


[PS] C:\Windows\system32>Get-Mailbox -Database "DefaultMailboxDB" | sort-object | Select-Object name,alias,RecipientLimits,servername,ProhibitSendQuota,IssueWarningQuota,MaxReceiveSize,MaxSendSize,DisplayName,Database,PrimarySmtpAddress,ProhibitSendReceiveQuota,@{n="Size(KB)";e = {$MBXstat = Get-MailboxStatistics $_.name; $MBXstat.totalItemsize}},@{n="Items"; e = {$MBXstat = Get-MailboxStatistics $_.name ; $MBXstat.itemcount; $MBXstat.storageLimitStatus}} | Export-Csv C:\MailboxSize_output.csv


This comnad will apply the recipient limit to 30 only to all the mailboxes located in a mentioned DB
[PS] C:\Windows\system32>Get-Mailbox -Database "DefaultMailboxDB" | Set-Mailbox -RecipientLimits "30"

If you want to exclude one mailbox from above database, run below command;
Set-Mailbox "attendance" -RecipientLimits "500"

Below command shows details of specific mailbox only;
Get-Mailbox -Identity attendance |fl

Not able to see the Deleted mailboxes in Disconnected mailbox


Issue: Not able to see the deleted mailboxes in Disconnected mailbox option after I was deleted the mailboxes.
As per the microsoft it will not show the deleted mailboxes on the spot as it will show once you run the below command; Once you run below command, it will show all the disconnected mailboxes'
If you don't run the above command, it will show once it ran the online maintenance of the DB.

Get-Mailboxdatabase | Clean-MailboxDatabase

http://smtpport25.wordpress.com/2009/04/22/deleted-mailbox-not-appearing-in-disconnected-mailbox-in-exchange-2007/

http://msunified.net/2009/05/13/deleted-mailbox-not-appearing-in-disconnected-mailbox-in-exchange-2007/

Friday, August 3, 2012

Install Remote Agents on Windows2008 R2 Servers

When you install the Remote Agent on Server's you might get the below error;

Below are the 2 steps to resolve this issue.


Installing Remote Agent on Windows Server 2003, Windows2008 & Windows2008 R2 in 2 ways;

1) You can install as shown in fig.


2) The best way would be installing remote agent in Silent Mode.For 32-bit remote servers
1  : Copy the RAWS32 and MSXML folders from the Backup Exec Server in a new folder on the Remote Server (C:\prog. files\symantec\backup exec\agents\RAWS32 and MSXML)
2  : On the Remote server, open command prompt and navigate to the RAWS32 folder and run setupaa.cmd
Example : D:\BEAGENT\RAWS32\>setupaa.cmd
3  : Go to Start-->All Prog-->Symantec-->Remote Agent Utility
4  : Click on the Publishing TAB, enable Publiching and ADD the NAME OR the IP Address of the BE Server, Restart the Remote Agent Service on the Remote Server
This will install the Remote Agent in Silent Mode
For 64-bit Remote Server:
1  : Copy the RAWSx64 folder instead of RAWS32 and run setupex64.cmd insteed of setupaa.cmd and follow the steps above


Once you installed Agent by using CommandPrompt, you will get BackupExec Remote Agent Tool, open that & add BackupExec. Server IP as shown below 


Here you completed the Installation of Remote Agent on Windows Server 2003 /2008/2008 R2

Wednesday, July 25, 2012

Enable Remote Desktop Connections on Windows2008 R2

Steps to Enable Remote Desktop Connections on Windows2008 R2;


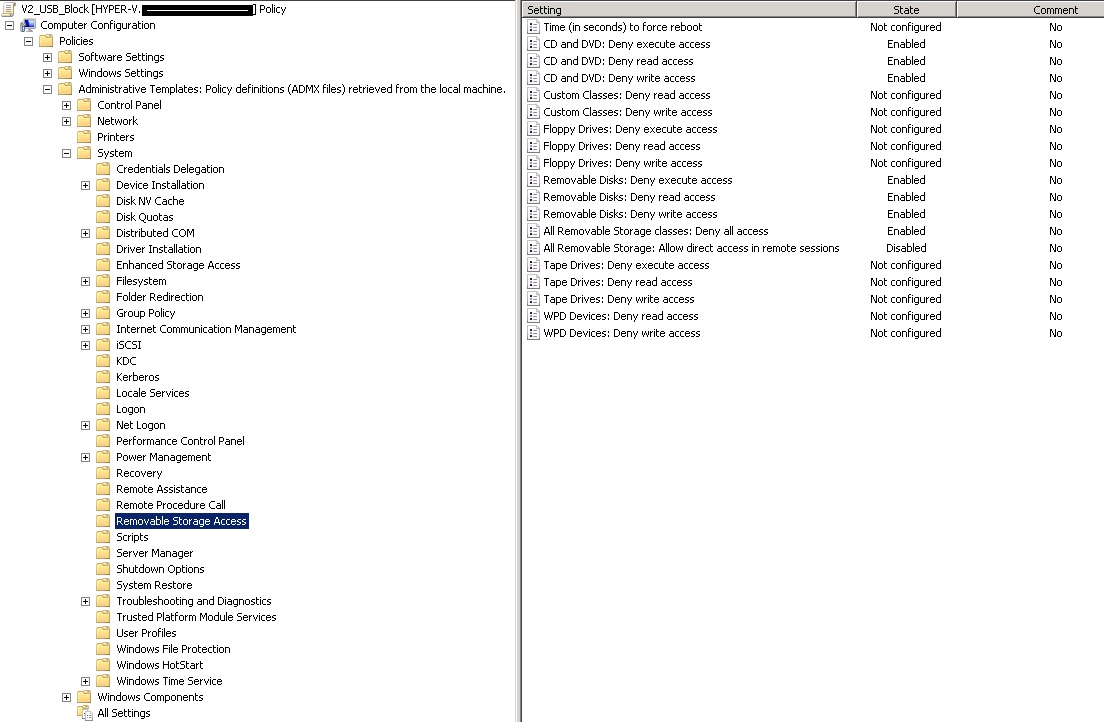
Block USB Storage Drive-Pen Drives-DVD-CD-Rom by using AD2008 GPO & Local GPO


Steps to block USB Storage Devices & DVD-CD-Rom drives by using GPO on Windows2008 & R2, below are the screen shots which are taken in Windows2008R2 AD.


Steps to block USB Storage Devices & DVD-CD-Rom drives by using Local GPO.
You can block it by using GPEDIT.MSC on a local PC of Windows7:


Even we can Block & UnBlock by Registry;


https://skydrive.live.com/?cid=ca38b51fb54ad84f&Bsrc=Share&Bpub=SDX.SkyDrive&resid=CA38B51FB54AD84F!214&id=CA38B51FB54AD84F%21214 - Disable USB Block


https://skydrive.live.com/?cid=ca38b51fb54ad84f&Bsrc=Share&Bpub=SDX.SkyDrive&resid=CA38B51FB54AD84F!214&id=CA38B51FB54AD84F%21214 - Enable USB Block


Monday, July 23, 2012

Commands (ipconfig, gpupdate/force, ipconfig/all etc.) are not working in Command Prompt on Windows7

This issue occurs normally when your PATH environment variable is not set correctly. SO you have to follow below steps to resolve it;


1. In a command prompt window, type 

echo %path%

This should display the PATH environment variable. In particular, it should have the directories path added  C:\Windows\system32 and C:\Windows in it. If it doesn't, this is your problem.

To fix it, do this:

1. Right-click Computer and select Properties.
2. Click the Advanced system settings link on the left.
3. Click the Environment variables button.
4. Find Path in the System variables list box and click the Edit button.
5. Add those two directories, C:\Windows\system32 and C:\Windows separated by a semicolon and terminated by a semicolon, at the front of the path environment variable.
6. OK out of everything.


Now it should fix your issue & enjoy.


it should look like as shown in below fig;